Sunday, 18 November 2012

Art Attack Cake

I was asked to create a cake for my colleague's daughter who was turning three and loved Art Attack and Mister Maker. I jumped at the cake at making an art themed cake, knowing that it'd be a lot of fun to make. Organised chaos sprung to mind!

I was told that her favourite colours were pink and purple - a little girl after my own heart! So I decided to cover the cake in a deep pink colour, with the theme of purple elsewhere. I knew that I wanted the cake to have an artist palette, paintbrushes and paint tubes on the top of the cake.

I used and coloured royal icing for the paint on the palette. I was so pleased with how paint like it actually looked, especially with the squeezed out effect with the peaks. I dipped the end of the paintbrushes in the royal icing that left a really realistic look of paint – looking a little messy and thick just like the real thing. The palette was made purely of flower paste to ensure that it dried hard. 


 The paintbrushes were constructed in three parts. A long sausage shape made out of flower paste with a small amount of sugar paste mixed in. A small rectangle for the metal between the handle and brush and a tear shaped tip for the brush. I coloured the handle with some caramel colouring and once air dried for a short while, I scored it to give the affect of wood grain. To make it look more like wood grain, I made a thin brown paint (water consistency) so it could be painted on to give a varnish affect. It worked as desired as the scored areas were darker and trapped the colouring beautifully.

The picture stood at the side was one of my favourite elements and was inspired by a cake I found online. It was made purely of flower paste and I painted the background of the picture first and then sketched the family afterwards. I thought that this was a endearing addition to the cake, especially because I drew it like I thought a three year old would and ensured that it was a representation of the family the cake was for.

I marbled some of the sugar paste decorations to give it a swirled look, rather than a block colour. I used a swirly embossing sheet and a quilt affect embossing tool to create some the decorations. I loved how they looked once placed on the cake. I think it added just enough texture and creative edge for it to be both girly and arty.


I loved how the paint tubes and leakages looked on the cake. This was the epitome of messy and fun art to me! I was so impressed with how amazing the royal icing leakages looked. 

Thursday, 15 November 2012

Peanut Butter Squares

This recipe is taken from Lorraine Pascale’s new book. It’s a lovely book and I’ve made three things so far. Two main meals and this beautiful sweet treat.  I could say many superlatives regarding these morsels of sheer genius, however I just need to stress that if you are a peanut butter fanatic like I am (as you know!) then you must make them.


It’s a brilliantly easy recipe and takes very little preparation – peanut butter, digestive biscuits, melted butter, brown sugar, chocolate, vanilla and chilled in the fridge when all combined. Easy peasy. It’s extremely indulgent, calling for most of a jar of peanut butter, however it does make 16 squares. They are quite large squares too so you could down size even more if you wish. I didn’t want to because they were so moreish and I do have quite a high threshold for sweet things. 


The next time I make these, I am going to cover them in white chocolate instead of milk chocolate. The recipe calls for dark chocolate but I went for milk, simply because I prefer the saltiness from the peanuts against the smooth, sweet milk chocolate – yum! 

I would say that these squares are a hybrid between a biscuit and a Reese’s peanut butter cup. 
Simply fabulous!

Sunday, 21 October 2012

Banana and Date Loaf Cake

I made this classic beauty on Tuesday to celebrate the final of The Great British Bake off (I already miss it and it's not 8pm on Tuesday yet!). Whilst I'm on topic, what did everyone think of the final? I was so elated with the outcome and I think all three gentlemen did amazingly well. As James said, it didn't feel as though there were any losers or runners up.

This is essentially Mary Berry's banana loaf recipe (which can be found in her Baking Bible), but I made a few tweaks to be more tailored to my taste buds. I have made the loaf around three times, sticking strictly to Mary's instructions – I can't argue with her now can I? She is a legend and just such a lovely lady. She would be my number one dinner party guest or afternoon tea partner – I think she'd be fascinating.


I added one more banana than the recipe states and around 100g of dates as I believed they could evoke a lovely, toffee like edge in the cake. It tasted as I'd hoped and gave it a different texture, richness and depth. I was ridiculously pleased that the dates baked consistently throughout the cake and didn't sink. I embraced the classic technique of rolling them in flour first and it must really work. This method was truly a baking myth for me, as it had never worked in the past with some fruits, but worked beautifully in this instance.


I added a honey glaze and walnuts to the top of the loaf, as although the cake isn't dry in any way, I simply wanted more decadence.  Additionally, I know that dates and walnuts work in harmony just like mascara enhances our eyelashes for example. 


I made the glaze with around 4-5 tablespoons of Acacia honey and 60g of butter. All you have to do is melt the two together and it soon becomes thick and cloudy. Once you visibly see this sticky matter changing like this, take it off the heat and leave it set for about two minutes and drizzle accordingly.  Add as many walnuts as you like, I think the nuttier the better!

I could have easily devoured this all by myself, but I took most of it to work to share with my friends.  It received excellent reviews and certainly perked them all up at 3pm!

Sunday, 14 October 2012

Welcome back Autumn

What does autumn mean to you? Me as a child says chestnut picking and walks in the woods with my family. Me as an adult here and now says, leaves on the ground, jumper dresses and dark lipsticks.

I seem to remember as a child having an unlimited supply of these wonderful nuts. Or a shopping bag full at least! Walks were an integral part of my childhood and I most definitely romanticise chestnuts. They make me gleam with happiness and nostalgia, but they aren't as they used to be. They appear to fall off the trees too early and haven't had the opportunity to become the huge tear drop esque nuggets that I remember fondly. Or were they ever that big? You know how things seem huge in your tiny child hands? Creme Eggs included! 

I wanted to bake something that both looks like autumn and has autumn in the ingredients (chestnut of course!).   I decided to bake something new to me, a torte. After flicking through a few baking books and searching the internet, I settled on Edd Kimber's Chocolate and Chestnut Torte. He describes it as basically a cooked mousse. I have been attracted to tortes in the past due to the lack of flour, but always picked something else as the ones I had seen on television always dipped in the middle. But then you see some fabulous tortes in Paris for example! 

I decided to show what's inside on the outside.  So me and Joe took to our park, which luckily we have just a few minutes away from our flat, to find leaves from chestnut trees to showcase on top of the torte.  We also picked various leaves to set the scene and mood of this autumn inspired blog.

This was a lovely after dinner dessert. Not too heavy, very rich and satisfying, so second helpings were not on the cards for me. It contains 70% cocoa Green and Blacks chocolate so I knew when I had had enough (my waistline was thankful for that for once!). The chestnut created depth to the torte in my opinion, similar to how coffee is with chocolate cake for example. You cannot necessarily taste it, but there is enough to create more depth and intensity. 


I bought a tin of chestnut purée from Waitrose, it wasn't sweetened like the recipe called for though, which I was a little apprehensive about. So I just added milk and icing sugar to the purée (which was stiff in and out of the tin, so needed to be loosened up) to hopefully make it sweeter. I did exactly the same to make the soft peaked cream.

Both cream and torte were delicious.

Monday, 8 October 2012

Grasshopper Pie, Hummingbird Style

A few weekends ago, Joe trotted off to London for the weekend to see his friends. As a result, I was at home with lots of relaxing to do. This meant three things - Americas's Next Top Model, Breakfast at Tiffany's and baking. I had to make something Joe really wanted - he needed rewarding since he did lots of washing up during the week when I couldn't be bothered or was too tired. What a star!

Grasshopper Pie was the obvious choice to me. Always a fan of mint chocolate, whether it's my mint choc chip cupcakes or After Eights. I made it the Hummingbird Bakery way set out in Cake Days minus the huge dollops of whipped cream on top. He's a lover of the cream, but I had a bit of a kitchen nightmare when my Kmix overwhipped the first 300ml of the cream, meaning I only had 300ml left for the filling! I got distracted with colouring my milky marshmallow mixture a perfect mint green. Mint is the main event and I thought that the extra whipped cream could have muted it. This was my convenient reasoning at overwhipping the cream anyway!

I made the biscuit base with humble bourbons (or you could use Oreos if you prefer). I'm so used to ginger or digestive biscuit bases and using bourbons is much better in many ways! For example, the melted butter in the processed bourbons made it look like soil (and I'd rather be in the kitchen with my 'soil' than in the garden!). I was a mucky mess by the time I had pushed the crumbs into the flan tin.


Melting the marshmallows into the milk was incredibly relaxing. I love seeing food melt, or change consistency right before me. This became a luscious velvety mixture after around five minutes of consistent stirring. The recipe tells you to fold in the cream to this minty mixture, but I had real trouble with this. I had to abandon this technique by just whisking it in. It seemed to work better for me than trying to fold it in. This green mass of matter was then dolloped into and completely filled my perfectly set soil case.


I loved the pie and so did Joe. The filling was light and the only thing I could compare it to is mousse, but it was a lot denser than mousse. The marshmallows must have given it the light texture. It had a wobble to it, like a baked cheesecake would. The bourbon base was addictive - I couldn't get enough of it! I would sit next to Joe, putting on my best eyes (like a cat would when they want something you have, almost stalking you until you give in) waiting for a morsel of the base. 

 I urge anyone who loves mint chocolate to make this.

Sunday, 30 September 2012

Browned Butter and Cinnamon Teacakes

This is the second time I have made these beautiful cinnamon morsels. How does everyone feel about cinnamon? It is my favourite spice and has been for many years now. There is nothing more inviting than walking into a bakery, a supermarket, or your own kitchen, that smells of warm cinnamon. Some say it's purely a Christmas spice. I think this is horribly restrictive and my taste buds couldn't cope without it for long! So it lives with me all year long. I love it in cakes, biscuits, porridge. It's the spice that just keeps on giving.

I made these from one of my favourite baking books, Homestyle Cookies, Muffins and Cakes. It can be bought here from The Book People for anyone who would like to buy it. It's a fabulous book with lots of choice. It's a go to book for me as I have made three or four things out of it which have been a success. 


The picture in the book is a little deceiving compared with my results though. They look like they have a lot of depth and mine look about half the size of them. I'm not sure what I'm doing wrong, if at all, as I know pictures in books can be misleading. Sometimes I could do with a 50p for scale so I can compare!

Despite the discrepancy in size, they are absolutely gorgeous. They taste like cinnamon brownies to me. Very rich, dense and soft.  I like that they wouldn't win the competition for the prettiest cakes, as sometimes you really don't want to slave away crumb coating on a Sunday!

1st birthday cake and 90th birthday cake

I wanted to show you a few pictures of the cakes I've made recently. One for Elizabeth's daughter's first birthday (Elizabeth is my boyfriend's cousin) and the other for my Grandma's 90th. I did think that the ages couldn't be more at the opposite end of the spectrum!

Elizabeth wanted a lovely pink cake with polka dots for Mya. I suggested the baby blocks as I have seen it on so many Christening and 1st birthday cakes. I feel that on big cakes, it's a very tasteful and dainty way to incorporate their name and show their age in such a way that isn't obvious.

You will have to forgive me on the photos, I didn't have time to stage a lovely backdrop sadly. So the humble worktop scenery it is! 


I thought that just the one butterfly was enough for this cake to remain simple and classy.
  The birthday girl had her first taste of cake at her party and she loved it.  
A child's first taste of sugar or cake is one to remember!  If I had it my way, it would go down as one of the firsts -  first tooth, first word, first taste of sugar...

Moving onto the other cake.  I made this for my Grandma and I had a brief from my mum - a vanilla sponge, almond filling and bunting style. So that is exactly what I did and my Grandma loved it! I feel like it's a nice September cake, almost marking the end of summer, as I don't think this bunting style can be used into autumn and winter (unless someone asked for it) as it's just too summery! It's a bit like wearing shorts in winter, I just wouldn't go there!

 
I covered the cake in almond flavoured buttercream first, then marzipan to enhance the almond experience, then sugarpaste.  I textured the bunting with a vintage vine embossing sheet.  I cut out sugarpaste letters to say 'Happy Birthday Grandma' around the circumference of the cake. Those cutters are amazing. I got them from Ebay for approximately £1.80 and the postage about the same and they're wonderful value for money. If you are interested and have been looking for a while for something like this just like I was, you can buy them here.  

I used tappits for the 90 on the bunting.  Tappits are brilliant and I urge anyone to use them.  I had given them a wide birth for months thinking they'd be too hard to use... turns out I was wrong! You need to know that 1) you will need to use flower paste and roll it out very thin 2) dust a little cornflour on the tappit and 3) you'll need to air dry the flower paste on both sides for a few minutes before cutting out.  If you stick to these rules, you can't go wrong.  The best part of all is tapping them out.  A few of my numbers went flying across the room as I've been too heavy handed!  All part of the fun.  I got my tappits and embossing sheet from Purple Cupcakes if anyone is interested in them.

Thanks for reading as always!  

Wednesday, 15 August 2012

J'adore Paris: Part Deux

Enjoying the most amazing dessert I've ever had - it was fresh, sweet and delicate.  Joe loved it too and he isn't a fruit fan at all.
 
 The interior of Ladurée oozed heritage and style.  Eating here was a wonderful experience and I feel so lucky to have visited. 


 The view from the top level of the Musée d'Orsay, with the sculptures below.  You aren't allowed to take photos of the art work as you may fade the paintings (hence I have no record of anything else in there) and I was shocked to see people disobeying this rule.  Some of the works of Monet and Vincent van Gogh are featured here.
 

 This restaurant was something else entirely.  The nicest, strangest and most sytlish restaurant I've been in! It has an amazing centrepeice - the clock face at the back wall there. 


 The above two photos are taken from the top of the Musée d'Orsay.
 
 The Musée d'Orsay's exterior, a former rail station.
 
 A lovely view of the Seine near the Musée d'Orsay.
 
 Situated on the Rue de Rivoli, La Cure Gourmande had wonderful biscuits, nougat and caramel.  I could have spent a lot more euros than I did in there! 

 Again, Angelina's is nestled on the Rue de Rivoli and I wish I'd had more time and the hunger for it! We stumbled across this beautiful patisserie after reading about it on the internet, known to be one of the greatest places to eat in Paris.  I had just eaten when we found it and couldn't have possibly stomached more delectable delights.  To be visited next time!

 You can tell how much I spent in Ladurée (I bought a day bag, notebook, a box of their speciality tea and a key ring).  I wish I had an unlimited supply of  Ladurée in my life, their macarons are a delight that you just couldn't get bored of.  Don't you think that even the bags are chic?
 
 A typically Parisian street next to our hotel - tightly packed cars and filigree-esque balconies on the buildings.

 We returned to the Avenue Montaigne on the last day to get pictures in better light (we went there at dusk before).  Carrie Bradshaw fell in this Dior!
 
 One of Dior's windows - high end designers have the coolest visual merchandising.

 Oh Chanel! I will have money for some of you one day!

 Can you spot me? This roundabout is so picturesque.  Why can't ours look like this?

 My macarons are in this box.  How lovely, tasteful and stylish is it?

 Finally took to a garden and shared the macarons. 

 Perfect macarons in my opinion, very different to Pierre Hermé, more chewy and gracefully bursting with flavour.
  My favourite was the purple macaron, which was violet flavour.  My Second favourite was the bold yellow, citron flavour.  
 
 What flavour of macaron to devour next?

Enjoying a glass of champagne in the café across the road from our hotel, on our last day.  Champagne has never tasted so good.  The café experience in Paris is so special.  You have to be seated, waited on and you pay later.  I wish all places were like this because everything would feel like an occasion.  The staff are also extremely respectful.  They take their job very seriously.

J'adore Paris: Part Une

Well it’s been quiet on my blog again! I have no other excuse other than I haven’t been baking ‘just because I want to’, as I need to cut down on cake.  My waist line has been increasing of late and I’ve had to make some cut backs (much to my horror!).  I miss baking cakes just for fun to try a new recipe.  I should fatten up my friends and family instead so I still get to bake.

So I thought I would give you a little insight into my trip to Paris instead of a baking post.  Me and my boyfriend went on 30th July - 3rd August and travelled via train to London and then the Eurostar.  We stayed in a four star hotel just off the Champs-Élysées, with a bedroom view of the Eiffel Tower, which was perfection!  Most sights were about three Metro stops away, so I felt really in heart of Paris.

I felt incredibly privileged to have the Arc De Triomphe so close to us too, which is located on the Champs-Élysées and was around a ten minute walk away from our hotel. I wanted to scream when we casually walked down the road we stayed on, onto the Champs-Élysées and to my left was the Arc De Triomphe in the distance! 

I would also like to make a point of the fact that me and Joe didn't have to pay for any of the sights we saw.  It was free for us as we are under 26 years of age and are from the EU! 
Here are some photos of the beautiful city 

  This is the view of the Champs-Élysées and Eiffel Tower at the top of the Arc De Triomphe

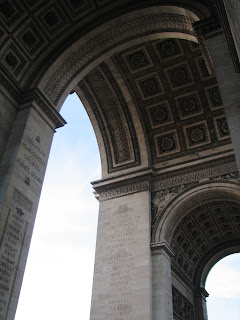
 This shows the amazing work and detail inside the Arc

 
 The stunning, goregous, creepy, awe inspiring, gothic treasure, Notre-Dame 
 I was incredibly moved by this Parisian gem, the interior is just as stunning as the exterior.

 I saw Pierre Hermé on one of Lorraine Pascale's food shows months ago and knew that I had to go when I was in Paris.  She waxed some serious lyrical about them.  The shop was small, but stunning, with a lot of choice.  The flavours were lovely, some were dusted in lustre and some were speckled, which gave them character.  The texture was more like cake than what I'm used to with macarons - I expected more chewiness.  But some had more chewiness than others!


 I thought this looked very French and was down the extremely affluent Avenue Montaigne (if you're a Sex and the City fan, Carrie spent a lot of time shopping down this street!)


 I really tried to look chic while I was in Paris.  Ray Bans and dark lips every day.

 The breathtaking Eiffel Tower of course! I couldn't get enough of it - taking masses of pictures and trying to lap up the atmosphere and ambience.


 The two photos above are of Les Invalides and the gardens next to it, close to the Eiffel Tower as you can see! A lot of Parisian buildings similar to this have gold on them.  Very regal. 
 Now, this was something else and nothing I've seen compares to this.  The light show was magical. And I never say 'magical' because it's just too cheesy and Disney for me and I don't use it lighly... but it really was! Lots of people gather at Trocadéro to catch this for five minutes on the hour when it gets dark.  The atmosphere here was lovely and there's lots of people offering to take your picture and wishing you a brilliant trip.  The picture doesn't really do the light show justice sadly.